
There are a number of issues I had with Foundations of Rome‘s solo mode “Gardens of Ceres”, chief among them that Ceres doesn’t integrate some essential aspects of the multiplayer experience and that it only comes with cardboard tiles where everything else in the game is a nicely designed miniature. I already tried to address the former with improved rules, and here is a potential fix for the latter: custom designed minis.
Designing It
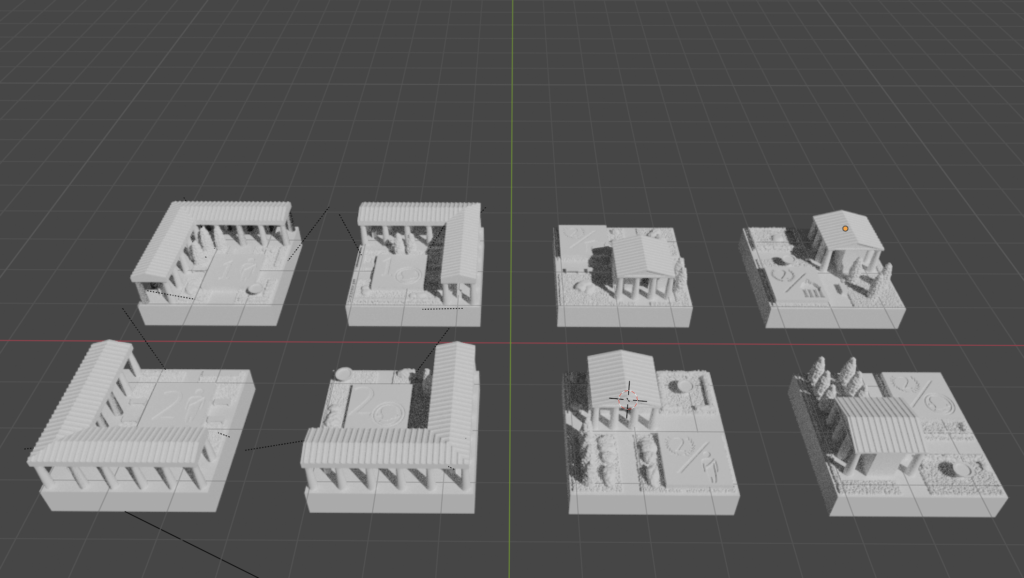
I once again used Blender 3D with a simple mixture of subdivision surfaces and boolean operations, but this time adding geometry nodes for detailing (more on that later). The hardest part about this project was to fit the scale and style of the original pieces. FoR isn’t consistent in that in itself. For example, the scale of a normal residential building is way different than that of a monument or a civic building. I ended up with three approaches:
Initially, I had planned for a symmetric shape that is rather robust such that the pieces could be drawn from a bag and ended up with the right piece. I liked this design a lot, but it just was too small a scale and didn’t match the normal minis. I then did simplified versions and settled on the middle one as the scale that fit best.

The thing that took me the longest way trying to reproduce the style / detail work of the original pieces. For example, all roofs in Foundations of Rome have a pattern of small dots. But when I tried to do something similar, it always ended up looking directly on an FDM printer (probably would have looked nice on an SLA printer). I also tried to add a small raised lip to further mimic what the original miniatures do, but after many attempts gave up and revered back to the original roof design.
The other problem was that the grass, hedges, trees and walkways just looked too clean. So I dove into Blender’s “geometry nodes” which is a node based system to manipulate geometry. Initially, nothing seemed to work. It took me 2-3 days to figure out that this was caused by me working on a millimetre scale and some objects had transformations on them that scaled them by a factor of 100-1000, just from moving them around, scaling, and not paying much attention to it.
Once I flattened the transformation into the actually vertex positions (i.e. “Apply Transform”), everything suddenly came to life and I could finally get back to the actual task. It’s surprisingly difficult to come up with good detailing because what might look good in a render might turn out very different in a 3D print. For example, some nicely crafted grass patterns turned out to be so small that the printer just mushed it all together and hardly any visible detail survived. Or I tried to apply displacement textures of leaves on to the trees but again, the scale is just too small. It also easily happens that what are independent small dots in the model end up being connected in the print. Long story short, this was a lot of testing and it turned out what worked best was to use very crude detailing.

On an SLA resin printer, I would probably have gotten away with much finer detail but I wanted to make this printable on my FDM printer with a 0.25 mm nozzle.
Another interesting lesson learned is how to model things such that no support structures are needed to print them. On this small scale, it’s actually quite difficult to remove support structures after printing and not leave nasty surface scaring that’s in difficult to reach places. The answer here was to intentionally add overhangs into the model at some key places such as the roof.
Take for example the roof of this buildings: there are parts that are floating in mid air and if the printer tries to add plastic there, it will simply create a mess. However, printers are able to create small “bridges”, starting on one fixed point and then pulling a strip of plastic to another fixed point.

The question was how to tell the printer to use the column to create such bridging instead of it randomly trying to put plastic in mid-air. The answer was to add small sections that only create the bridges and leave the printer no other choice than to do the right thing. The respective part needs only be one layer high, so in my case 0.05 mm and hardly is noticeable in the final print.
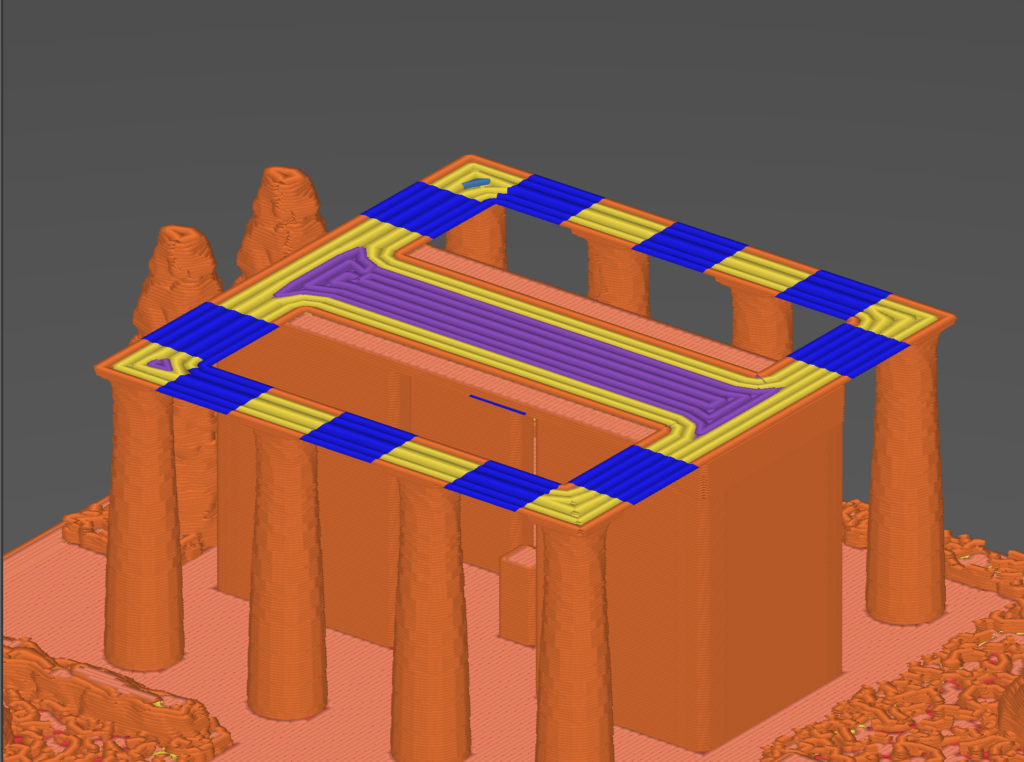
Once these bridges are established, the printer will hit a layer that is filled over the whole area and realise where good anchor points for further bridging are and where not. Without this extra step in between, it tried to fill the area horizontally and created lines that were completely mid-air, thus requiring supports.

The end result of this trick is that all the miniatures work without any support, at least on printers / slicers that have good precision and consistency. And here are some final designs fresh off the printer:

Printing Tips
Important: These models have been designed for 0.25mm nozzles and 0.05mm layer height! If you’re using a standard 0.4m nozzle that comes as default with most printers, the minis will likely not print correctly or at all. Since the minis have a base of 25mm, each column is only 1-2mm and trees can be even smaller. Printing on an SLA resin printer should work without issues.
At least on my Prusa Mini+, no support is needed to print them correctly. I’ve used some standard Anycubic PLA (olive green) without any tweaking besides turning on ironing (makes top surfaces smoother) and lowering the print temperature after the first layer to reduce stringing. However, at this small scale and with this amount of tiny detail, stringing is to be expected. Plan to spend some time with a sharp crafter knife or a hot gun to remove the stringing.
Bonus tip: what works quite well is to use some white acrylic paint and flood the engraving of the scoring indicator and then whipping off the excess on the top surface with some isopropanol alcohol. This makes the writing pop and easier to read.
STL Files & License
Here are the files for download. Please note the license file in the ZIP. You’re free to print for personal use, leave a comment if you do so. However, you’re prohibited from uploading them on other sides like thingiverse, printable, etc or put the stuff in your Etsy shop! This was a fun pet project for me and I’m happy to share the results with the community. But it would be disappointing if someone takes it and tries to profit from them in whatever form. So don’t spoil the fun for me!
- Horseless Carriage Overlays.zip – 31.2 MB (v1, last updated Jul 14, 2024)
Disclaimer: Use at own risk! In particular, check for print artifacts such as blobs or sharp edges that might damage your game components. For more information, check license file. All copyright regarding Foundations of Rome itself of course belongs to Arcane Wonders.
Hi Alex! Much appreciated for this and for the detailed background story on how you got to this result. Very entertaining.
Seeing Alex’s efforts in Blender encourage me. I use Blender to design boardgame components and organisers. In my case that’s through using a laser cutter or a CNC. I like how he used geometry nodes to adjust the level of detail.
The parts of this article talking about the printing constraints was useful to me because I’m considering making items to be printed.
I came across this when I was looking for 3D print stuff for Foundations because I have a great idea I’d love to see, but don’t have the time nor talent myself, nor can I find one.
I think a little square that fits over an empty lot to indicate it is one of the active “for sale” would be awesome. Maybe even some little laurel leaves around the edge like the remix from hxxps://www.thingiverse.com/thing:6510989
What do you think?
We usually use the claim pieces from an unplayed user, but with a five-player game this past weekend needed to put random little LEGO pieces on the open lots. 😂
The best idea I have seen so far was someone on BGG got transparent acrylic cubes: https://boardgamegeek.com/thread/3298921/gardens-of-ceres-acrylic-garden-tile-upgrade . They used it to make the Gardens of Ceres cardboard pieces stand out more, but I think it’s perfect for highlighting the available lots and looks very sleek.
Personally, I actually like the additional “challenge” of having to spot what is available and what not. 😀